
Chapter 26: Stormrook Looms

| Victory | Defeat |
|---|---|
| Seize Rimorgue | MC is defeated |
| Enemy captures Nephilim Army Base |
| Objective | Reward |
|---|---|
| Stormrook | 560 gold 20 faction XP |
| Mytimia | 409 gold 4 faction XP |
| Lucia | 379 gold, 3 faction XP |
| Kalletos | 496 gold, 4 faction XP |
| Miletos | 318 gold 3 faction XP |
| Melmonde | 1644 gold 16 faction XP |
| Rimorgue | 8575 gold, 130 faction XP |
| Challenges |
|---|
| Complete the chapter within 10 turns |

Don’t put away the Heartseeker or Kesh’s Toolkit from last stage. There’s plenty more walls to siege this time around. I recommend sending raiders and cavalry to weaken the squads on the right wall and then retreat out of range of the cannons on the southern wall. Send some forces (including cavalry) east toward the southern gate, avoiding cannon range and positioning them to assault the walls on turn 2. This should allow you to take out the rest of the cannons altogether, without exposing your forces to cannon fire (or at least a full 3 cannons, if some of the right side survived). You might need a teleport if you don’t have cavalry on the south side.
Inside the walls of Stormrook the enemy is packed quite tightly with mages and gunners. You can send in a few sentinel squads and try to whittle them down with archers or rely on exemplar/temporal modulator shenanigans.
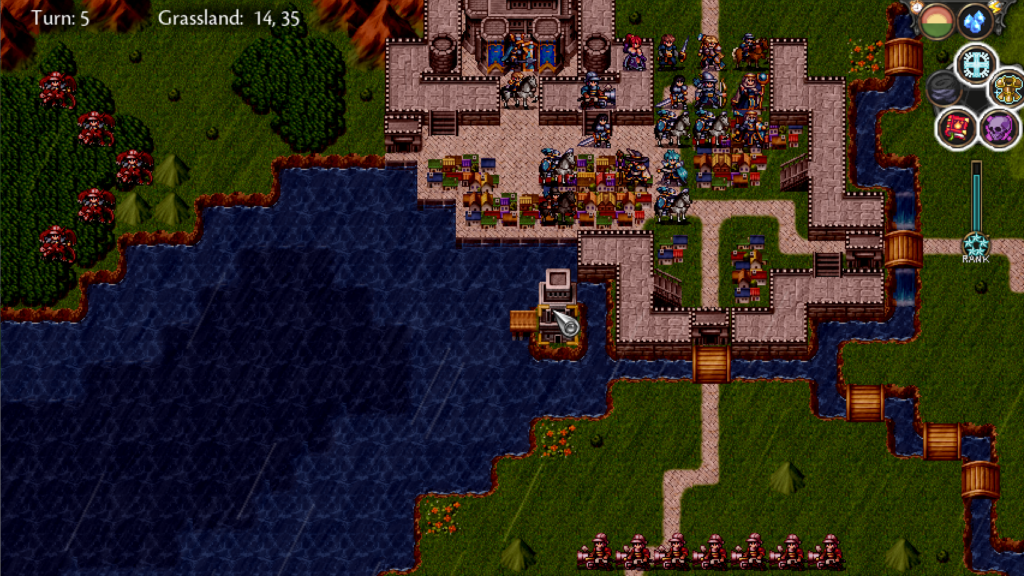
Once you’ve taken Stormrook the wall to the north collapses, the brood of Kalytos the Red fly in from the west, cannons arrive from the south and an entire cavalry brigade is deployed to the north.. If you are having chapter 12 flashes, you’re not the only one!

You could prepare better for the cannons than I did & have 7-10 squads lurking south of the gate while your other squads finish the interior of Stormrook. Without doing that, you will have to let them get closer before attacking and may still eat some triple cannon salvos. Luckily you can survive such much better than in chapter 12.
If you really want to make the 10 turn limit here, you need to charge the cavalry with teleport and blessing on a strong squad. Set exemplar on them and leave them where they can be attacked on all sides. Modulator can help, but it’ll only deal with the first three attacks.
I positioned all my raider squads to the western edge, just out of range of the dragon riders with the intent of hitting & running next turn. My cavalry and infantry was similarly positioned just out of range to the western and southern forces. I positioned Beatrix’s flying squad in the middle so she can choose to go after either the dragons or the cannons. You need to finish both the dragons and the cannons swiftly such that you are ready for the oncoming cavalry charge.
Once the enemy advances, go all in on both sides. First with archers and then clear out the survivors. The cannons are likely to end up in one long vertical column, so be careful to attack with the closest squads first such that you can still reach the rear of the column once you burn through the middle. For the cannons, you want to attack with aggressive and wipe them: you’ll take no damage as you can almost always kill the front 3 gunners in your first round.
Once that’s taken care of, move some sentinel squads up to hold the first cavalry charge and start using the walls for hit and run archery attacks with your raiders. I sent Beatrix flying up through the mountains to the west of the base to get a head start with liberation.

The defensive strategy is to weather the other half of the cavalry at Stormrook as well, but it’s much more doable to charge the second group. Finally seize a ton of objectives and Rimorgue. There’s one more cannon squad on the walls, but it should fall swiftly.
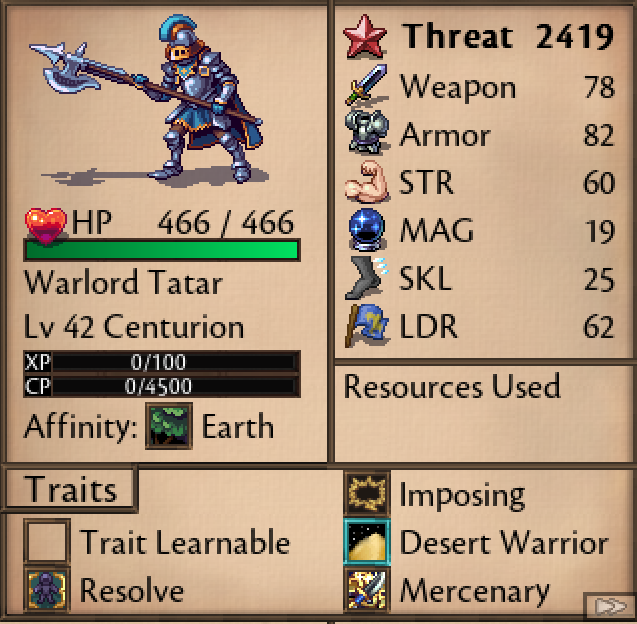
There’s a bazaar way off to the east as well, if you want to spend some time visiting it. The bazaar here was loaded for me: two legendary artifacts and some good mercenaries. I recruited a dark swordmaster with lithe assault and the unique centurion Warlord Tatar.


It took me 12 turns with the more defensive strategy, but I still ended up with S rank. Perhaps due to the 23 surrenders I performed.
Interlude
I recruited yet another swordmaster; this one lightning affinity with concentration. That’s probably not the best trait for a high skill damage dealer (can no longer crit) but I did need one more swordmaster.
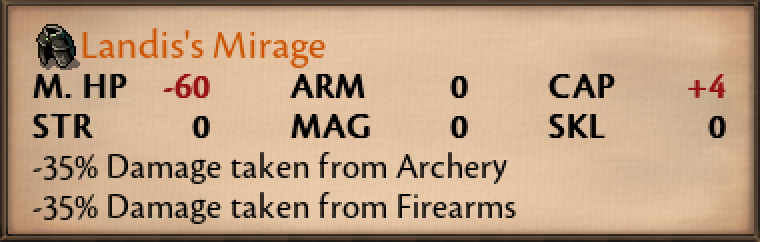
Lysandis needs 4 more capacity to add Landis’s Mirage to his firearms tank squad and I gave the Ace of Spades to Centhos the Muse. Centhos is used mostly to force surrender, so he is already a support squad who doesn’t fight that much & can advance when I want a bit of bonus damage.
If you want to be optimally prepared for the next chapter then you can choose to spoil it’s twist below. The chapter is completely doable without spoiling, which is what I’d recommend the first time you play, but it’ll be much harder to get the optional achievement blind.
Show SpoilerChapter 26: Stormrook Looms