
Chapter 12: Upheaval

| Victory | Defeat |
|---|---|
| Defend Fort Eureeka | MC is defeated |
| Defeat Casamir’s entire army | Fort Eureeka is captured |
| Objective | Reward |
|---|---|
| Chest 12,15 | Proof of Merit |
| Chest 13,15 | Everlasting Potion |
| Challenges |
|---|
| Survive against Casamir’s army for 2 turns |
| Survive against Casamir’s army for 4 turns |
| Survive against Casamir’s army for 6 turns |

Tooltip: “Permadeath is removed for this chapter”. That’s .. that’s a good sign right?
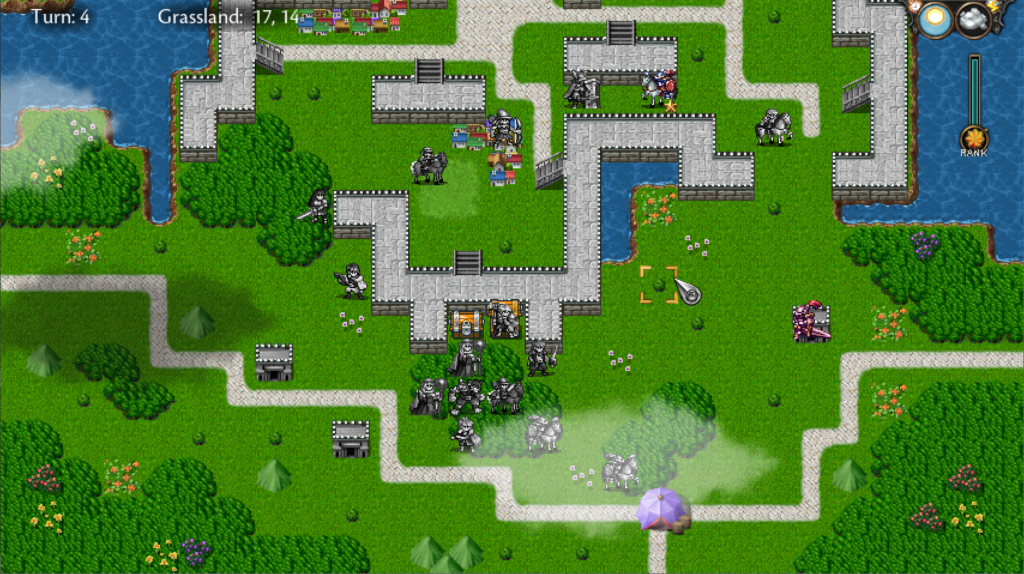
Upheaval is a fascinating stage that can be approached in a few different ways and has a number of optional objectives as well as one of the hardest achievements in the game. I’ll show you how to achieve it, but you don’t have to go for it on your first play through. In fact, just playing through normally is likely the most enjoyable path the first time.
If you want to play this stage defensively & not worry about the bonus objectives, then a reasonable approach is to block the left and right sides and set archers on the walls. You’ll be able to slow Teremor’s assault and rain death down from above to whittle his forces down. Note that the treasure chest with a 5 on it will count down & then disappear, so you likely will have trouble getting that. You could send out a cavalry squad to grab it though, once you punch a hole in the enemy lines.
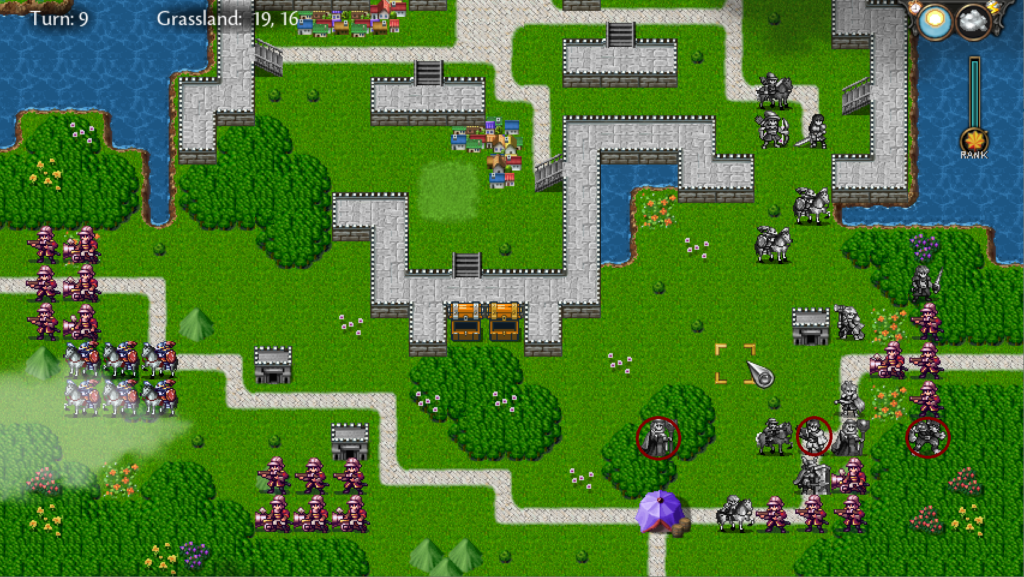
If you want to go for the achievement, I recommend focusing your forces to the left side and using two defensive units to block the right side. You can also put a few gunners/archers on the walls to pick off forces on both left and right. Delay killing Teremor as long as possible while the rest of your squads blitz the left side.

Teremor should let his other forces attack first, giving you time to wipe out the left side while you whittle down the advancing forces on the right. Eventually he’ll charge, by which point you should have dispatched most of his other forces.
Rotate your left squads to the right, taking the treasures and visiting the bazaar. Take out Teremor and send your squads from the right down as well. Your goal is to arrange all of your forces to the far lower right. If using horse archers, I recommend you arrange them to the northern end of your forces. Stefan and other light squads should be positioned in/near the woods, where they can ambush and have improved evasion. Each turn after Teremor goes down there will be some foreboding banter amongst MC’s followers until a second army arrives.

That’s a lot of cannons! And an equal number of gunners .. uh oh. Not to mention six cavalry units that each include 2 dragoons. Just in case there were not enough guns. Some good news: here on out is all optional achievements, so don’t fret if your forces don’t quite have staying power against gunpowder units.
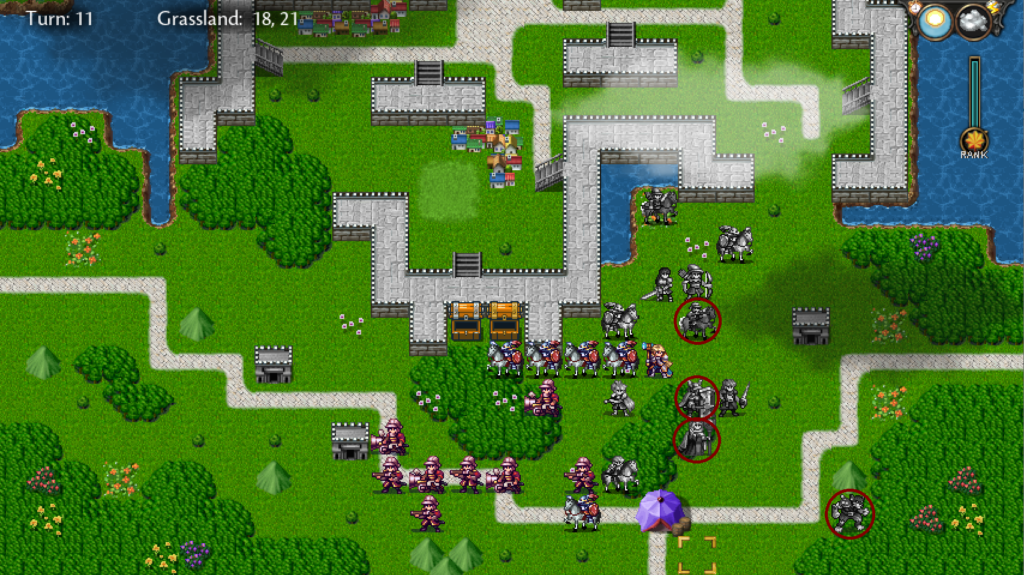
If you managed to reach the lower right, you will be perfectly positioned to attack on player phase at least. I recommend using horse archers to attack the upper right cannons & then retreat them to the north out of range. Finish off the top three cannons and take out the bottom three cannon units with your other squads. Your priority should be to take out at least two cannons from each cannon squad first, then weaken or destroy the gunner squads and then finish off damaged squads. Try to send your light infantry into the forest: Stefan and Raskuja will be quite hard for gunners to hit with the terrain (cannons cannot miss, just get glancing blows however) and can make ambush attacks.
Keep in mind the enemy will go for your lowest threat squads, so keep a few of those in the forest for extra defenses. Sybil (far left), Raskuja and Centhos (mage in the middle) are my lowest threat squads and are decently positioned. I could have had one of the cavalry units retreat to cover Centhos though, instead of retreating north.
The enemy on the left side will come right. However, if you have squads further north than shown here, the enemy may move in that direction instead. Sybil was a little too far left & took one cannon blast, killing some of her squad, but that’s ok; she’s really just bait. Raskuja and Centhos also took some hits from gunners and partially defeated cannon squads, but both survived to be tenderized at least one more turn.
Next turn destroy the surviving squads and position to face the other half of the enemy. You can either slowly retreat and try to kill them with hit and run tactics coupled with archers on the wall or charge straight into them. I’ve done it both ways, but this time I built a few 3 sentinel groups and outfitted them with defensive traits and artifacts, so I am electing to charge. Again positioning is key to either sacrifice some less important low threat squads or force the enemy to attack a squad that can take a few cannon shots. Note that morale will steadily drop under cannon fire and when surrounded, even if a unit manages to survive .. so try not to isolate anyone too much.

Centhos and Sybil are served up as sacrificial lambs while Diana and MC’s huge threat rating will keep them from taking many attacks. Lysander’s squad turned out insanely tanky, but has even higher threat rating so I positioned him bottom left where some enemies might be able to reach him and not other squads.
Centhos and Sybil became one with cannonballs. RIP. Lt Archibald, Abigayle and my custom sentinel squad are this round’s bait targets and I was able to position Raskuja’s half dead squad so he can bait a mostly dead cavalry squad over to the forest & actually kill it.

Lt Archibald’s gunners yielded swiftly once the front spears were down, but all the other bait squads actually survived. With another round of three horse archer squads hit & running plus all my core cavalry and infantry squads still kicking, it’s about time for the mop up & the game’s hardest achievement unlock! Note that you need to beat the reinforcements within 6 turns of them arriving.
This is the most emphatically I’ve thrashed stage 12, but also the most I’ve prepared for it & grinded out CP/XP with my last bronze arena token. Thanks and strategy credit to yahiko for his comprehensive steam guide that my plan was based on.
Squad Effectiveness
Lysander’s squad was incredibly tanky, but with 21K threat, he didn’t get attacked unless I threw him at the enemy. Just for grins, I tried the stage again & had him charge the entire left side without support. He managed to survive a round without any losses, however; his morale went to zero along with his damage output. I guess I can’t blame them for that, being surrounded by cannons.

In retrospect, Lysander would have been better served swapping out some defensive heavy infantry for zweihanders, centurions, swordmasters or dragons/mages from a less stalwart squad. That could have helped Sybil or Abigayle survive longer and had both squads do more total damage.
The horse archer squads were incredibly useful for hit & run attacks and importantly did not have their offense degrade over the stage, while most other squads took some losses. With the tiara artifact, Jules’s squad had higher threat than some melee squads which let him stick around a bit more safely. The other two had to be extremely careful to retreat or get mobbed.
MC’s squad was my best offensive squad and still had some ability to survive, as long as they weren’t under fire from a full cannon squad. The red dragon, ice mage and mercenary champion lead the attack but MC was no slouch herself. Abigayle’s squad was similar, but not quite as effective or tanky with two dragons and a siren.

In contrast Diana’s squad tended a little too defensive. Her squad didn’t tear into the back row cannons unless Diana’s executioner/high morale gave her a bonus attack. Her high threat rating also meant that having two healers and two half healers (paladins) and two sentinels to soak firearms didn’t get utilized that much anyway. I would have been better served to take a mage from Sybil or Centhos’s squad and put them into her and Lysander’s squads instead of making them pure tanks. Or a dragon from Abigayle’s squad, since they have more hp and some armor.

The light infantry was effective at dodging guns and spears in the forest, which helped keep enemies occupied and the sword masters did quite a bit of damage. Stefan’s squad was mostly lightning elemental and then I added +skill artifacts to maximize dodge. However, that put them a little high on CP, such that they didn’t get attacked as much as Raskuja.

Barnabus and Sir Rolante both were valuable for their mobility (each had 6 mounted warriors and a templar) but took extra damage from sentinels. A mage or something could have helped them kill the cannon back line, but they were more effective against the enemy cavalry.
Lt Archibald’s squad was definitely the least useful. Most enemy squads had sentinels, which are resistant to firearms, and gunners are really squishy. Centhos and Sybil were just used for bait and cleaning up damaged squads with their smaller leadership score and lack of tier 3 front liners.
Interlude
This feels a little like the opposite of army building ..
Do take advantage of your ability to reform squads here to ensure you take the best and a variety of classes with you. Honestly you probably don’t have any/many more squads than the max you can take, but you might have some leftover mercenaries to squeeze in.
Somehow I forgot to put The Outcast or Centhos the Muse into a squad and my other mage heavy squads were story squads that are MIA for now, so I ended up without any mages. Don’t be me! Make sure you look at the characters not in a squad too.
Chapter 12: Upheaval